Overview
In this tutorial, you will learn how to reset the admin user’s password in Jenkins.
Have you ever created a Jenkins instance for your local development needs and then forget the username you set? Don’t fret, we’ve all done this before. Thankfully, the password can be reset by doing a number of tasks from the command-line.
You will need elevated privileges to perform a Jenkins admin password reset. We will be modifying the security context of the Jenkins instance, and essentially turning authentication off temporarily.
Once we have disabled password authentication, we will log into the Jenkins web console and set a new password for our user.
Disable Jenkins Security
Log onto your Jenkins server using an account with root privileges. Once logged in, look open Jenkin’s configration XML file into a text editor.
In the example below, we are opening the file in VIM.
sudo vi /var/lib/jenkins/config.xml
With the configuration file opened, perform a search for the useSecurity string. This can be done in VIM by pressing ESC and then entering /useSecurity.
The line you are looking for should resemble the following.
<useSecurity>true</useSecurity>
Press i to enter VIM’s insert mode. Modify the value between the <useSecurity> tags and set the value to false.
<useSecurity>false</useSecurity>
Save your changes and then exit the text editor. If you are using VIM, press ESC and then enter wq! to write your changes and then exit the editor.
Your changes will not take affect until Jenkins is restarted. Restart the service now.
sudo systemctl restart jenkins
Reset Jenkins Admin’s Password
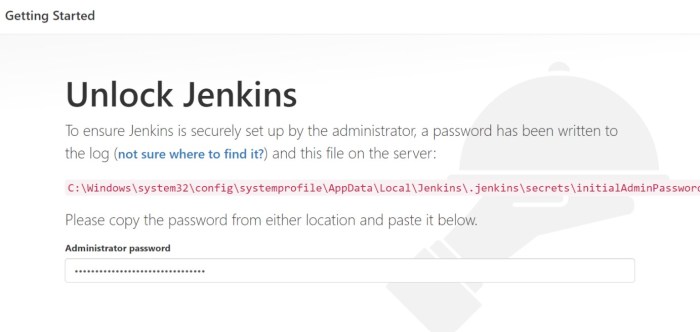
After Jenkins restarts navigate to the web console. Notice that you were not prompted for a username or password. This is because we disabled security in Jenkins’ configuration file.
If this is a publicly shared Jenkins instance, you should disable public access to the server until the password reset is complete.
To reset admin’s password, do the following.
- Click on People on the left-hand navigation menu.
- Click on the Admin.
- Delete the user account.
- Navigate to Jenkins / Manage Jenkins.
- Click on Configure Global Security
- Check the Enable Security check box
- Under Security Realm, select Jenkins’ own user database
- In the Authorization section, select Logged-in users can do anything.
- Unselect Allow anonymous read access.
- Click Save to save your changes.
Create New Jenkins Admin User
Once you have completed the tasks above, you will be redirect to a page where a new Admin user can be created. Fill in your new details and then click Create First Admin User.
You have no created a new Admin user with a new password.
Conclusion
Reseting the admin’s password is not a simple process. It also exposes us to dangers by disabling user logins, allowing anonymous users full control over the Jenkins server.
This tutorial showed you how to reset the admin password by removing the current account, and then recreating it. A better solution would be to have multiple admins, where possible, and have another admin reset the password.