INTEGRATING CLOUD JIRA AND GITHUB COMMITS

PROBLEM STATEMENT

Connecting cloud GITHUB and JIRA so that whenever there is a GITHUB commit it should get reflected over JIRA development dashboard.

Applicable to: – Jira and GITHUB cloud version

Plugin Required: – https://marketplace.atlassian.com/apps/1219592/github-for-jira?hosting=cloud&tab=overview

STEPS INVOLVED

INSTALLATION OF GITHUB FOR JIRA PLUGIN INSTALLATION

Click over the plugin link provided above under plugin required section then over the marketplace page click on option Get it now make sure we have choosen cloud version.

Choose your cloud site on which you want to install this plugin

Once configured properly it should shown under your manage app section of JIRA as added

INTEGRATION STEPS POST PLUGIN INSTALLATION

Post this addition your GITHUB cloud might ask some authentication to allow your JIRA cloud to access your GITHUB repository give the required permission post this we are done.

Now if we commit anything over GITHUB and provide the JIRA story/task id in GITHUB commit message box as shown below.

Next if we see now the JIRA dashboard under that particular story ID it should show the GIT commits done against that particular story/task.

BAMBOO ELASTIC CONFIGURATION FOR AWS AGENTS

We can use the elastic bamboo configuration of atlassian bamboo to get it connected to AWS EC2 instances as agent. Elastic bamboo uses remote agent (Amazon Machine Image) to create instances of remote agents within amazon ec2.

We can executed our builds on these elastic agents in similar way we we use to run it over our local agents and remote agents.

REQUIREMENTS

  • Having appropriate access over bamboo instance to modify and update the elastic configuration config
  • Access to AWS account with secret key and access key

CREATING ACCESS KEY UNDER AWS FOR CONNECTING VIA BAMBOO

Login to your AWS account go to my security credentials next click on create new access key

CONFIGURATION AT ATLASSIAN BAMBOO LEVEL

Next login to your bamboo account then go under overview and then to elastic configuration under ELASTIC BAMBOO option.

Next add all your AWS related authentication details under Elastic Bamboo configuration as given below.

We can change the various option available here as per need like we can keep the values on how many instances are required at maxium or we can setup Shutdown delay option (TIme before the instance shuts down automatically.)

We can setup maxium number of elastic agents and shutdown delay

Once the setting is done we can click on Save Changes. Post we can click on start a new instance or manage instances

Enter the values like number of instances required what kind of image is required to be build like ubuntu stock image or windows stock image

Once we click on Submit bamboo should create elastic agent for us same we can go and check and verify under our AWS console account.

CHECKING THE AGENT UNDER AWS CONSOLE

Triggering Bamboo build from Jira comment

Understand how Build Queue Service works

The following REST API endpoint can be used (e.g. with curl) to trigger a Bamboo build:

curl -X POST -u admin:password http://bamboo-host:8085/rest/api/latest/queue/PLAN-KEY?os_authType=basic

Replace:

  • admin with a Bamboo username that has the permission to trigger a build
  • password with the respective user’s password
  • http://bamboo-host:8085 with Bamboo’s Base URL
  • PLAN-KEY with the Bamboo plan key for which a build is to be triggered

Ensure the curl command works before moving on to section #2 below.

How Build Queue Service can be triggered using JIRA Webhooks

  1. The URL in section #1 above can be translated to a Webhook URL as follows:http://admin:password@bamboo-host:8085/rest/api/latest/queue/PLAN-KEY?os_authType=basicusername and password are inserted in between the Base URL (after the double slashes and before the hostname) using the format username:password@
  2. When configuring Webhooks, the option Exclude body must be checked

Example: A Build will be triggered when a Comment is added in a JIRA Issue

Attach windows node to linux master jenkins instance

CONFIGURING WINDOWS AS JENKINS NODE FOR A LINUX MASTER

Here the Jenkins master is configured over the Linux operating system and we require to connect to a windows server to it as an agent.
Connection methodology: – Launch agent by connecting to the master

Navigate to Manage Jenkins -> Configure Global Security

STEPS INVOLVED

Under configure system search for the option Agents option and then choose TCP port for inbound agents option as Random if you want to keep as Fixed that also can be chosen as per the port connectivity feasibility.

Next step move the Manage Jenkins -> Manage Nodes ->

From there choose the option New Node give any required name and choose it permanent agent and click on OK.

Under next window provide Remote root directory which should be a valid path on the windows server.
Important step here is choose Launch method which should be chosen as Launch agent by connecting it to the master , after this click on save button.

Once both option choose properly next we should get below window for agent creation methods

So under above screenshot there are three different method using which the agent can be launched.

Launching the windows agent

As till now we have properly configure the agent but we have yet not launched it as next step we require to launch it.

Login to the window server and then open the Jenkins instance on the windows server and navigate to Manage Nodes option

Click on the agent which we require to launch here it is Windows Agent-Test

This option will again it us to the Agent Launch window

Make sure appropriate Java version is configured over the Slave windows server Next click on the  option it should download JNLP file  with name slave-agent.jnlp

It will open a java applet window which will ask for prompt to run the Jenkins Remote Agent click on Run option. If all the option provided properly this agent should get connected to the Jenkins Linux Master properly with below prompt window

Now if we again go to the Nodes option we can see the newly create agent in the list as active with its system architecture as Windows SERVER

We can try running a sample job also over windows agent which will publish the agent info

Installing & Configuring Docker on CENTOS

Before enabling any repositories , we should be sure that we have installed the necessary required packages to support Docker.

COMMANDS

  • yum install -y yum-utils device-mapper-persistent-data lvm2
  • yum-config-manager –add-repo https://download.docker.com/linux/centos/docker-ce.repo
  • sudo yum install docker-ce
  • Once docker installed properly it should show below message
  • Using the appropriate service management commands we need to enable Docker CE service so that it gets starts by itself while the service reboots and then start the Dokcer CE service.
    Command:- systemctl enable docker && systemctl start docker && systemctl status docker

    • Command to start docker service:-  systemctl start docker
    • Command to stop docker service:-  systemctl stop docker
    • Command to status docker service:-  systemctl status docker
  • To test the docker service we can pull a dummy image can use below command to pull and image
    command:- docker pull httpd
  • As we have pulled the httpd image so if we execute the command docker images it should show the image name
    Command:- docker images

DOCKER STORAGE DRIVER

docker info | grep Storage

LOGGING MECHANISM AND MODIFICATION

to change the logging mechanism to json format uncomment below lines from the file (nano /etc/rsyslog.conf )

# Provides UDP syslog reception
#$ModLoad imudp
#$UDPServerRun 514

SETTING UP DOCKER SWARM

Below are the list of commands we can use initiate docker SWARM and then create docker manager and docker worker nodes

[root@devops811 user]# docker swarm init –advertise-addr 172.31.24.252
Swarm initialized: current node (xg1ijkriquxlnoisn1bczmekx) is now a manager.
To add a worker to this swarm, run the following command:
docker swarm join \
–token SWMTKN-1-3n4d8netwy1m7faqntq80tjgwi8oej7frr2q6af424ea4tommp-a8o3q97s57fgoc42b7vdtvz7l \
172.31.24.252:2377
To add a manager to this swarm, run ‘docker swarm join-token manager’ and follow the instructions.
[root@devops811 user]# docker swarm join-token worker
To add a worker to this swarm, run the following command:
docker swarm join \
–token SWMTKN-1-3n4d8netwy1m7faqntq80tjgwi8oej7frr2q6af424ea4tommp-a8o3q97s57fgoc42b7vdtvz7l \
172.31.24.252:2377
[root@devops811 user]# docker swarm join-token manager
To add a manager to this swarm, run the following command:
docker swarm join \
–token SWMTKN-1-3n4d8netwy1m7faqntq80tjgwi8oej7frr2q6af424ea4tommp-4lpjtv23azvq4he3206ga3cgg \
172.31.24.252:2377

docker commands cheat sheet

1_JUOITpaBdlrMP9D__-K5Fw

Contents

CHECKING LOGS COMMANDS
BUILD COMMANDS
SHARE COMMANDS
RUN COMMANDS
DOCKER MANAGE COMMANDS

CHECKING LOGS COMMANDS

  • To view real time logging of docker container
    docker logs –f <containername>
  • Viewing log for a particular timestamp
    docker logs <container_id> –timestamps
    docker logs <container_id> –since (or –until) YYYY-MM-DD
  • To see the last N number of lines in log
    docker logs <container_id> –tail N
  • If we want to see the specific log then we can use the grep command
    docker logs <container_id> | grep pattern

DOCKER BUILD COMAMNDS

  • To Build an image from the Dockerfile in the current directory and tag the image
    docker build -t myimage:1.0 .
  • List all images that are locally stored with the Docker Engine
    docker image ls
  • Delete an image from the local image store
    docker image rm alpine:3.4

DOCKER SHARE COMMANDS

  • Pull an image from a registry
    docker pull myimage:1.0
  • Retag a local image with a new image name and tag
    docker tag myimage:1.0 myrepo/ myimage:2.0
  • Push an image to a registry
    docker push myrepo/myimage:2.0

DOCKER RUN COMMANDS

  • Run a container from the Alpine version 3.9 image, name the running container “web” and expose port 5000 externally, mapped to port 80 inside the container.
    docker container run –name web -p 5000:80 alpine:3.9
  • Stop a running container through SIGTERM
    docker container stop web
  • Stop a running container through SIGKILL
    docker container kill web
  • List the networks
    docker network ls
  • List the running containers (add –all to include stopped containers)
    docker container ls
  • Delete all running and stopped containers
    docker container rm -f $(docker ps -aq)
  • Print the last 100 lines of a container’s logs
    docker container logs –tail 100 web

DOCKER MANAGE COMMANDS


All commands below are called as options to the base docker command.
Run docker <command> –help for more information on a particular command.

node plugin Manage plugins
registry* Manage Docker registries
secret Manage Docker secrets
service Manage services
stack Manage Docker stacks
swarm Manage swarm
system Manage Docker
template* Quickly scaffold services
Volume Manage volumes
Node Manage nodes
config Manage Docker configs
context Manage contexts
image Manage images
engine Manage the docker Engine
network Manage networks


Methods for upgrading Jenkins instance

Contents

DIFFERENT METHODS OF UPGRADING JENKINS
Upgrade prerequisite
Method to check currently installed Jenkins version
Methods available to update Jenkins
Upgrading using Jenkins yum update command
Upgrading using by downloading the war file
Upgrading Jenkins from Manage Jenkins

DIFFERENT METHODS OF UPGRADING JENKINS

On production environment it’s very important the Jenkins remains updated with so that it gets all it’s required security updates/patches time to time.

We should use always the LTS release over production environment as they are long term releases and are stable.

There are different mechanism available to upgrade the Jenkins server and can be chooses as per the infrastructure availability.

Upgrade prerequisite:-

  1. Make sure we have already taken backup of existing jenkins server
  2. Check the existing Jenkins version currently present

Method to check currently installed Jenkins version

  1. Using the JENKINS-CLI command, go to the location under which Jenkins-CLI is present and execute this command.
    java –jar jenkins-cli.jar –s https://localhost:8080/ version
    PIC1

So here we can see the current version is 2.190.3

  1. Using the web UI login to Jenkins and scroll to bottom right of the screen there also we can see the current Jenkins version.
    PIC2PIC3

Methods available to update Jenkins

Upgrading using Jenkins yum update command

  1. In-case we have configured/install the Jenkins as sudo yum command then we can use the same sudo command to update the Jenkins version.

command to update Jenkins sudo yum update jenkins

This command will fetch out all the updates and prompt us to whether we want to install the updates or not just press the option Y

PIC4


Once Y option is chosen to install the updates it will start fetching the updates and finally it will update it update Jenkins to the latest version as shown below here it is upgraded to latest version i.e. 2.222.3-1.1

PIC5

Upgrading using by downloading the war file

Jenkins can be upgraded by downloading the war file also for this go to the location where Jenkins.war file resides and then get the download the link required version war file from http://mirrors.jenkins.io/war-stable/

Before this please take the backup of existing Jenkins war file.

Once the specific version Jenkins war file is downloaded we can restart Jenkins and it should take the updated Jenkins version now.

Upgrading Jenkins from Manage Jenkins.

Jenkins can be upgraded from Manage Jenkins menu also just go to manage Jenkins option click on Upgrade Automatically.

PIC6


Once clicked on upgrade automatically option it will take us to the upgrade progress screen once completed it should success.

  1. PIC7

Once update we can see the Jenkins version as per any of the method mentioned earlier.

PIC8

So we can see Jenkins has been upgraded from 2.19 to 2.222… Version.

PIC9

Exporting and Importing specific project between different JIRA server isntance

Sometime we need to replicate the things on staging JIRA environment in-case environments are not in sync and the project doesn’t exist on the production environment.

In this case we have either option to refresh the whole staging environment or we can export specific project also from production JIRA to staging JIRA environment.


Applied to: – Server JIRA not for Cloud JIRA version as configuration plugin not available for cloud version

Following the steps we can migrate specific project between different instances of JIRA.

Prerequisite:-

STEPS

Login to the target JIRA instance (Staging) then go to the configuration manager by clicking on the cogs wheel icon as shown below.
PIC2

It will take us to the configuration snapshot screen under which we can create the snapshot for the project which we want to export.

Click on option Create Snapshot
PIC3

Under the next screen provide all the details as required like snapshot name, project whose snapshot needs to be created
PIC4

Once provided all the required details click on the create option it will create once the project is created once the snapshot is created successfully it should screen like below so we can see project snapshot got created with 88 configuration elements and 23 issues.
PIC5

Next step we have to download the snapshot by clicking on the cog wheels under action column of configuration snapshots.
PIC6

The snapshot will be downloaded as a zip file and same can be seen under the downloaded location so our creation of snapshot part is completed next we need to import this project snapshot onto the target JIRA location.
PIC7

Login to the target JIRA location and again go to the configuration manager section from the cog’s wheel drop down list.

This time choose two option 1st choose deploy option from left menu bar then choose From Snapshot file option as marked below :-
PIC8

As soon we click on the From Snapshot file option it provided us with option to choose the .zip snapshotfile so we can browse and choose the snapshot zip file once we choose the .zip file it should come as below.
PIC9

As show now click on Deploy option as we click on Deploy option it will ask whether we can to merge the snapshot to the existing project or do we want to create a new project.

Here we will select new project also give the project name and Key.
PIC10

Next screen it will be showing what all it will be importing like (projects,issue types , screens)..
PIC12

Under this wizard keep clicking next and once we get the option where we get Deploy button we can just hit the Deploy button.
PIC13

Once the snapshot is deployed successfully it will show screen like below :-
PIC14

So this means the snapshot is successfully imported to target JIRA instance from the source JIRA instance we can now browse the project which got imported and verify it as shown below.

Project successfully migrated from JIRA instance one to JIRA instance two.
PIC15


Creating AWS Instance from customized AMIs

Brief on AMIs

AMI (Amazon Machin Images) are used to build instances. They store snapshots of EBS volumes, permissions, and a block device mapping which determines how the instance OS controls the attached volumes.

AMIs can be shared, free or paid and can be copied across AWS Regions.

Type of AMI as per storage based

All AMIs are categorized as either backed by Amazon EBS or backed by instance store. The former means that the root device for an instance launched from the AMI is an Amazon EBS volume created from an Amazon EBS snapshot. The latter means that the root device for an instance launched from the AMI is an instance store volume created from a template stored in Amazon S3.

STEPS INVOLVED

Creating EC2 Instance whose AMI will be created

Choose EC2 service from AWS console and then click on Launch Instance

1

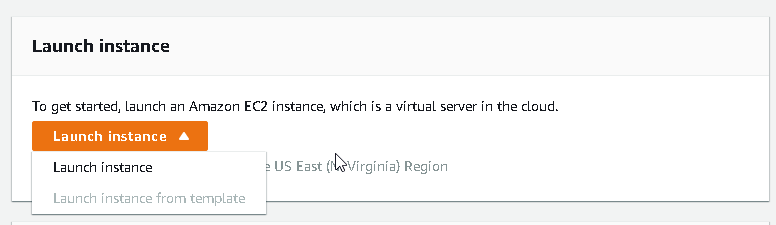
After choosing the option Launch Instance choose type of AMI to be launched for this example we are using Amazon Linux 2 AMI click on Select option.

2Option choose the opt3

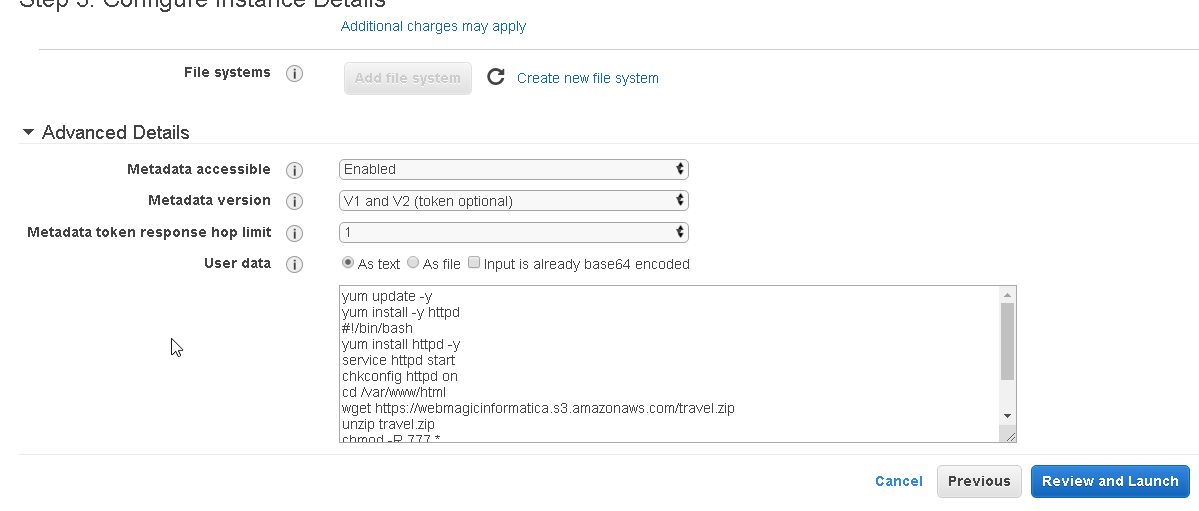
Click on next under this step we will add the script to install and configure httpd service and will install a sample static website.

This script we will provide under the User data option as shown.

Script can be copied from this GITHUB link :-

https://github.com/devops81/httpdsite/blob/master/script

4


After this click on Next and keep going to next step with required settings once reached on Security Group option we need to do following configuration changes.

Under the security group click on the option Add Rule and add http rule as showing below:-

5

http rule will allow browsing the httpd over the internet after this finally click on Review and Launch option and then finally on Launch option.

Once the instance is ready after launch we can see it under running instance panel and can connect to it using normal AWS procedure.

6

If we now copy the public IP of the running instance and paste it over browser we should be able to browse the httpd site which we deployed under User Data option while configuring the EC2 Instance.

7

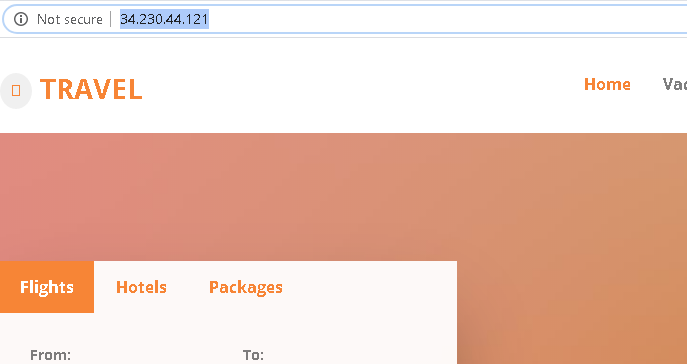
So till here we were successfully able to create a AWS EC2 instance with a bootstrapping option under the User data and as soon the instance is ready we were able to browse the httpd site which got configured during the startup of the EC2 instance.

Creating our custom AMI out of existing instance

Now as we have successfully create an instance with our site configured over it as a next step we want to create customized AMI image out of it so that we can launch new instances using this customized AMI.

Steps to create the AMI

Right click on the Instance which we created and then go to Image-> Create

8

Under the create image option choose the values appropriately  and click on create image option.

9
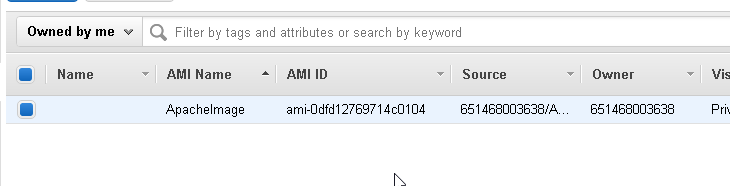
After this if we go to AMI tab option under AWS console we should see the newly created AMI under the console.

10

Launching new AWS instance from customized AMI

Choose the AWS Launch Instance option from AWS console after this choose the My AMIs tab under Quick start opton the My AMIs tab should show the AMI which we have create just now in above steps.

11

Choose the AMI which we have created and click on select option after this keep selecting the option as we create normal new AWS instance under the security option we need to make sure that we have selected httpd inbound rule so that we can browse the httpd site over internet.

12

After we have selected all the required option under each step we can selection the Launch option.Once we have launched the new instance using the customized AMI we can see it under the AWS console.

15

Next we can try browsing the public IP of the newly create AWS instance it should take us to the httpd site.

14

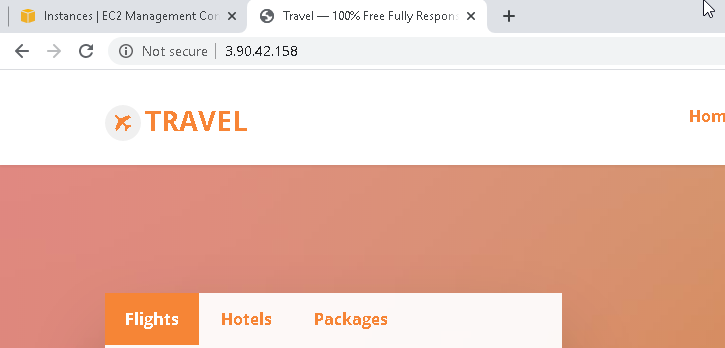
So this shows that we were successfully able to create customized AMI and then were able to spinup new instance from that particular customized AMI image.


BASIC OF CLOUDFORMATION UNDER AWS

Cloudformation if we define is a automation product available in AWS as a service. It is an IAC (Infrastructure as code) using cloud formation we can create infrastructure using YAML or JSON file and we can use this template to create,update delete our infrastructure

Benefits of implementing Cloudformation

  • We can test our infrastructure first on test environment and then can move it to Production.
  • The Cloudformation template can be reused.
  • Across the business these template can be used as library and can be used across teams.
  • Template can be used for temporary periods so team can use it to create , update and delete if required for temporary or short period.
1

BASIC OF TEMPLATE FILE

It is a JSON or YAML format file which defines logic resources which needs to be created , updated or deleted when integrated with the stack.

2

Under the file Resources is mandatory tag.

Description :- gives free text description for templates

Parameter :- can ask for input from user like what amount CPU is requres for a blcok.

Output :- What output user should receive like if it’s a wordpress tempalte user should get URL of wordpress site after running the template.

Resources :-

WHAT IS STACK

Stack is a container which contains logical resources which are defined under the template files and uploaded over STACK.Stack create,update or deletes physical resources for each o the logical resources defined under the template file.

CREATING STACK BY UPLOAD TEMPLATE

Open your AWS Cloud console and navigate to cloudFormation service

3

On next window click on a create stack (With new resources)

4

Next windows we will get multiple option of choosing the template like upload a existing template , use a sample template , create template in designer under this example we are upload an existing template so we will choose the option Template is ready and then under specify template window we will choose the option upload the template file.

5

At the third step you can choose the option of uploading the template template can be saved on local drive or on github or over S3.

For this example template can be found at
https://github.com/devops81/CloudFormation/tree/master/lab_files/01_aws_sa_fundamentals/getting_started_with_cfn – You don’t have permissions to view Try another account

Once template has been uploaded it will come something like below :-

7

After this click on NEXT under this screen we require to provide a STACK NAME after providing the stack name click on Next again.

8

Under the next screen you can choose option for IAM role for permissions on how cloudFormation can create , modify , delete resources in the stack if not required you can keep as it is once done with configuration on this screen click on Next it will take us to the Review stack window if anything needs to be updated we can lick on respective Edit button otherwise we can just hit the create stack button.

9

Once we click on create stack button it will take us to actual window where we can see stack creation progress.
10
We can see the progress of stack creation by click on the refresh option provided under the Events tab. Once the stack is created we can see the status as completed.

11

Next if we go to the Resources tab we can see the Physical resources for example here (S3 Bucket) has been created as per the logical resources provided under the template file.
Resource can by anything defined under template file :- (VPC , EC2 INSTANCE , S3)

12

So we have seen how to create a template , upload a template over stack and then how that stack uses the template to create Physical resource.