Effortlessly Migrating Databases with AWS Database Migration Service
Exploring various database options on AWS often raises the question: what about existing on-premises or cloud databases? Should we start from scratch, or does AWS offer a seamless migration solution? Enter Amazon Database Migration Service (DMS), designed to handle exactly that.
Amazon Database Migration Service (DMS)
Amazon DMS allows us to migrate our existing databases to AWS securely and efficiently. During the migration process, our source database remains fully operational, ensuring minimal downtime for dependent applications. Plus, the source and target databases don’t have to be of the same type.
Homogeneous Migrations
Homogeneous migrations involve migrating databases of the same type, such as:
MySQL to Amazon RDS for MySQL
Microsoft SQL Server to Amazon RDS for SQL Server
Oracle to Amazon RDS for Oracle
The compatibility of schema structures, data types, and database code between the source and target simplifies the process.
Heterogeneous Migrations
Heterogeneous migrations deal with databases of different types and require a two-step approach:
Schema Conversion: The AWS Schema Conversion Tool converts the source schema and code to match the target database.
Data Migration: DMS then migrates the data from the source to the target database.
Beyond Simple Migrations
AWS DMS isn’t just for migrations; it’s versatile enough for a variety of scenarios:
Development and Test Migrations: Migrate a copy of our production database to development or test environments without impacting production users.
Database Consolidation: Combine multiple databases into one central database.
Continuous Replication: Perform continuous data replication for disaster recovery or geographic distribution.
Additional AWS Database Services
AWS provides a suite of additional database services to meet diverse data management needs:
Amazon DocumentDB: A document database service that supports MongoDB workloads.
Amazon Neptune: A graph database service ideal for applications involving highly connected datasets like recommendation engines and fraud detection.
Amazon Quantum Ledger Database (Amazon QLDB): A ledger database service that maintains an immutable and verifiable record of all changes to our data.
Amazon Managed Blockchain: A service for creating and managing blockchain networks with open-source frameworks, facilitating decentralized transactions and data sharing.
Amazon ElastiCache: Adds caching layers to our databases, enhancing the read times of common requests. Supports Redis and Memcached.
Amazon DynamoDB Accelerator (DAX): An in-memory cache for DynamoDB that improves response times to microseconds.
Wrap-Up
Whether we’re migrating databases of the same or different types, AWS Database Migration Service (DMS) provides a robust and flexible solution to ensure smooth, secure migrations with minimal downtime. Additionally, AWS’s range of database services offers solutions for various other data management needs.
For further details, be sure to visit the AWS Database Migration Service page.
AWS offers a variety of powerful analytics services designed to handle different data processing needs. In this blog, we will focus on Amazon Athena, Amazon EMR, AWS Glue, and Amazon Kinesis, as these services are most likely to appear on the AWS Certified Cloud Practitioner exam. You can follow the links provided to learn more about other AWS analytics services like Amazon CloudSearch, Amazon OpenSearch Service, Amazon QuickSight, Amazon Data Pipeline, AWS Lake Formation, and Amazon MSK.
Amazon Elastic MapReduce (EMR)
Amazon EMR is a web service that allows businesses, researchers, data analysts, and developers to process vast amounts of data efficiently and cost-effectively. EMR uses a hosted Hadoop framework running on Amazon EC2 and Amazon S3 and supports Apache Spark, HBase, Presto, and Flink. Common use cases include log analysis, financial analysis, and ETL activities.
A Step is a programmatic task that processes data, while a cluster is a collection of EC2 instances provisioned by EMR to run these Steps. EMR uses Apache Hadoop, an open-source Java software framework, as its distributed data processing engine.
EMR is an excellent platform for deploying Apache Spark, an open-source distributed processing framework for big data workloads that utilizes in-memory caching and optimized query execution. You can also launch Presto clusters, an open-source distributed SQL query engine designed for fast analytic queries against large datasets. All nodes for a given cluster are launched in the same Amazon EC2 Availability Zone.
You can access Amazon EMR through the AWS Management Console, Command Line Tools, SDKs, or the EMR API. With EMR, you have access to the underlying operating system and can SSH in.
Amazon Athena
Amazon Athena is an interactive query service that allows you to analyze data in Amazon S3 using standard SQL. As a serverless service, there is no infrastructure to manage, and you only pay for the queries you run. Athena is easy to use: simply point to your data in Amazon S3, define the schema, and start querying using standard SQL.
Athena uses Presto with full standard SQL support and works with various data formats, including CSV, JSON, ORC, Apache Parquet, and Avro. It is ideal for quick ad-hoc querying and integrates with Amazon QuickSight for easy visualization. Athena can handle complex analysis, including large joins, window functions, and arrays, and uses a managed Data Catalog to store information and schemas about the databases and tables you create for your data stored in Amazon S3.
AWS Glue
AWS Glue is a fully managed, pay-as-you-go, extract, transform, and load (ETL) service that automates data preparation for analytics. AWS Glue automatically discovers and profiles data via the Glue Data Catalog, recommends and generates ETL code to transform your source data into target schemas, and runs the ETL jobs on a fully managed, scale-out Apache Spark environment to load your data into its destination.
AWS Glue allows you to set up, orchestrate, and monitor complex data flows, and you can create and run an ETL job with a few clicks in the AWS Management Console. Glue can discover both structured and semi-structured data stored in data lakes on Amazon S3, data warehouses in Amazon Redshift, and various databases running on AWS. It provides a unified view of data via the Glue Data Catalog, which is available for ETL, querying, and reporting using services like Amazon Athena, Amazon EMR, and Amazon Redshift Spectrum. Glue generates Scala or Python code for ETL jobs that you can customize further using familiar tools. As a serverless service, there are no compute resources to configure and manage.
Data Analysis and Query Use Cases
AWS offers several query services and data processing frameworks to address different needs and use cases, such as Amazon Athena, Amazon Redshift, and Amazon EMR.
Amazon Redshift provides the fastest query performance for enterprise reporting and business intelligence workloads, especially those involving complex SQL with multiple joins and sub-queries.
Amazon EMR simplifies and makes it cost-effective to run highly distributed processing frameworks like Hadoop, Spark, and Presto, compared to on-premises deployments. It is flexible, allowing you to run custom applications and code and define specific compute, memory, storage, and application parameters to optimize your analytic requirements.
Amazon Athena offers the easiest way to run ad-hoc queries for data in S3 without needing to set up or manage any servers.
Below is a summary of primary use cases for a few AWS query and analytics services:
AWS Service
Primary Use Case
When to Use
Amazon Athena
Query
Run interactive queries against data directly in Amazon S3 without worrying about data formatting or infrastructure management. Can be used with other services such as Amazon Redshift.
Amazon Redshift
Data Warehouse
Pull data from multiple sources, format and organize it, store it, and support complex, high-speed queries for business reports.
Amazon EMR
Data Processing
Highly distributed processing frameworks like Hadoop, Spark, and Presto. Run scale-out data processing tasks for applications such as machine learning, graph analytics, data transformation, and streaming data.
AWS Glue
ETL Service
Transform and move data to various destinations. Used to prepare and load data for analytics. Data sources can be S3, Redshift, or other databases. Glue Data Catalog can be queried by Athena, EMR, and Redshift Spectrum.
Amazon Kinesis
Amazon Kinesis makes it easy to collect, process, and analyze real-time, streaming data for timely insights and quick reactions to new information. It offers a collection of services for processing streams of various data, processed in “shards.” There are four types of Kinesis services:
Kinesis Video Streams
Kinesis Video Streams securely streams video from connected devices to AWS for analytics, machine learning (ML), and other processing. It durably stores, encrypts, and indexes video data streams, allowing access to data through easy-to-use APIs. Data producers provide data streams, stored for 24 hours by default, up to 7 days. Consumers receive and process data, with multiple shards in a stream and support for server-side encryption (KMS) with a customer master key.
Kinesis Data Streams
Kinesis Data Streams enables custom applications that process or analyze streaming data for specialized needs. It allows real-time processing of streaming big data, rapidly moving data off data producers and continuously processing it. Kinesis Data Streams stores data for later processing by applications, differing from Firehose, which delivers data directly to AWS services.
Common use cases include:
Accelerated log and data feed intake
Real-time metrics and reporting
Real-time data analytics
Complex stream processing
Kinesis Data Firehose
Kinesis Data Firehose is the easiest way to load streaming data into data stores and analytics tools. It captures, transforms, and loads streaming data, enabling near real-time analytics with existing business intelligence tools and dashboards. Firehose can use Kinesis Data Streams as sources, batch, compress, and encrypt data before loading, and synchronously replicate data across three availability zones (AZs) as it is transported to destinations. Each delivery stream stores data records for up to 24 hours.
Kinesis Data Analytics
Kinesis Data Analytics is the easiest way to process and analyze real-time, streaming data using standard SQL queries. It provides real-time analysis with use cases including:
Generating time-series analytics
Feeding real-time dashboards
Creating real-time alerts and notifications
Quickly authoring and running powerful SQL code against streaming sources
Kinesis Data Analytics can ingest data from Kinesis Streams and Firehose, outputting to S3, Redshift, Elasticsearch, and Kinesis Data Streams.
Deploying an Application Using Elastic Beanstalk: A Step-by-Step Guide
We can see here deploying a basic PHP based application using AWS beanstalk service. we want to run y our application in AWS without having to provision, configure, or manage the EC2 instances ourself.
Creating a Service Role for Elastic Beanstalk
First, you’ll need to create a service role for Elastic Beanstalk, allowing the service to deploy AWS services on your behalf. Follow these steps:
Search for IAM in the AWS console.
Select “Roles” and then “Create role”.
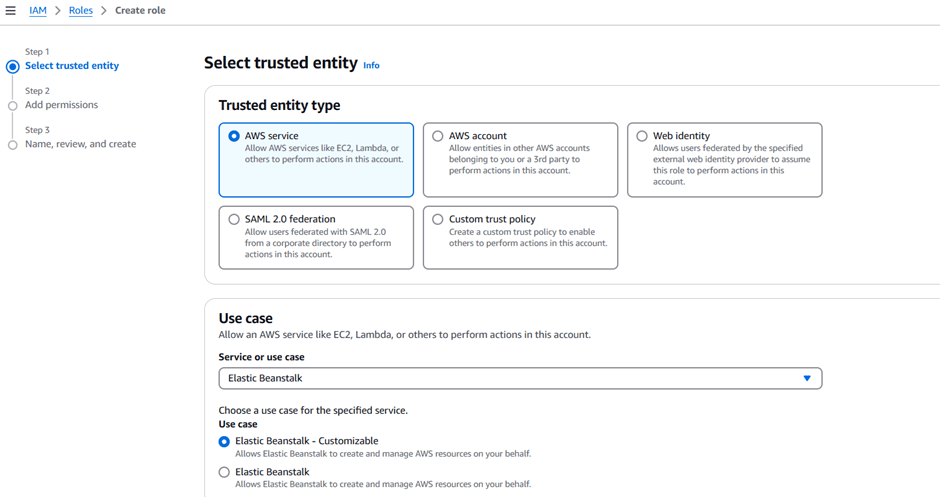
Set the Trusted entity type to AWS service.
Under Use cases, search for Elastic Beanstalk and select “Elastic Beanstalk – Customizable”.
Click “Next”, and then “Next” again as the permissions are automatically selected.
Name the role ServiceRoleForElasticBeanstalk.
Scroll to the bottom and click “Create role”.
REFERENCE SCREENSHOT
Configuring an EC2 Instance Profile for Elastic Beanstalk
Next, you’ll configure an EC2 instance profile to give the instance the required permissions to interact with Elastic Beanstalk:
Select “Create role” again in IAM.
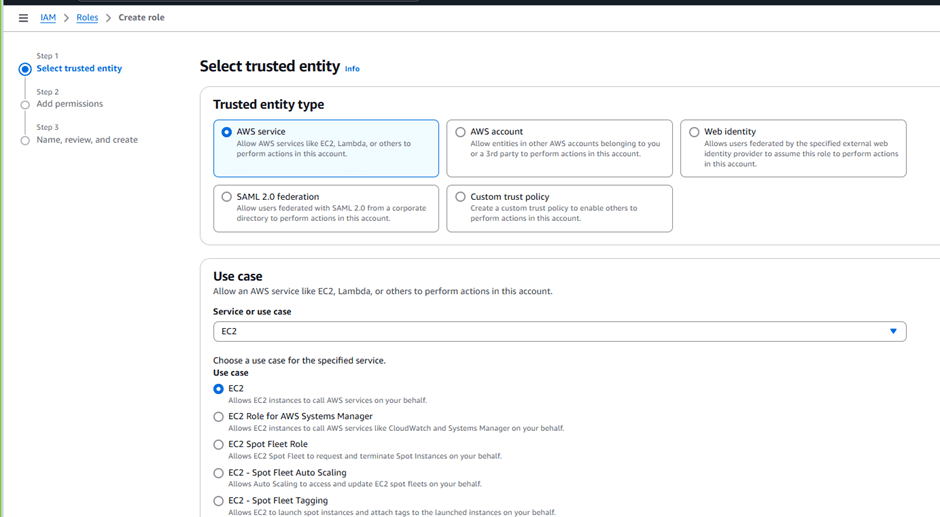
Set the Trusted entity type to AWS service.
Under Use case, select EC2 under Commonly used services.
Click “Next”.
Search for AWS Elastic Beanstalk read only policy and select it.
Click “Next”.
Name the role CustomEC2InstanceProfileForElasticBeanstalk.
Scroll to the bottom and click “Create role”.
REFERENCE SCREENSHOT
Creating Your Application
Now, you’re ready to create your application by uploading the provided code:
Search for Elastic Beanstalk in the AWS console.
Select “Create application”.
Choose “Web server environment”.
Enter the application name as BeanStalkDemo.
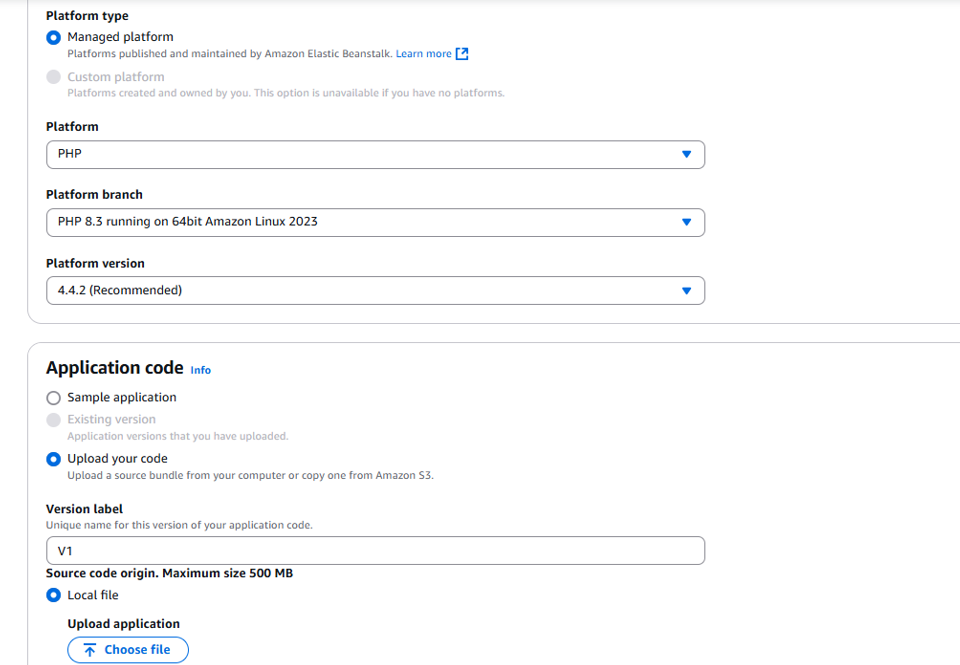
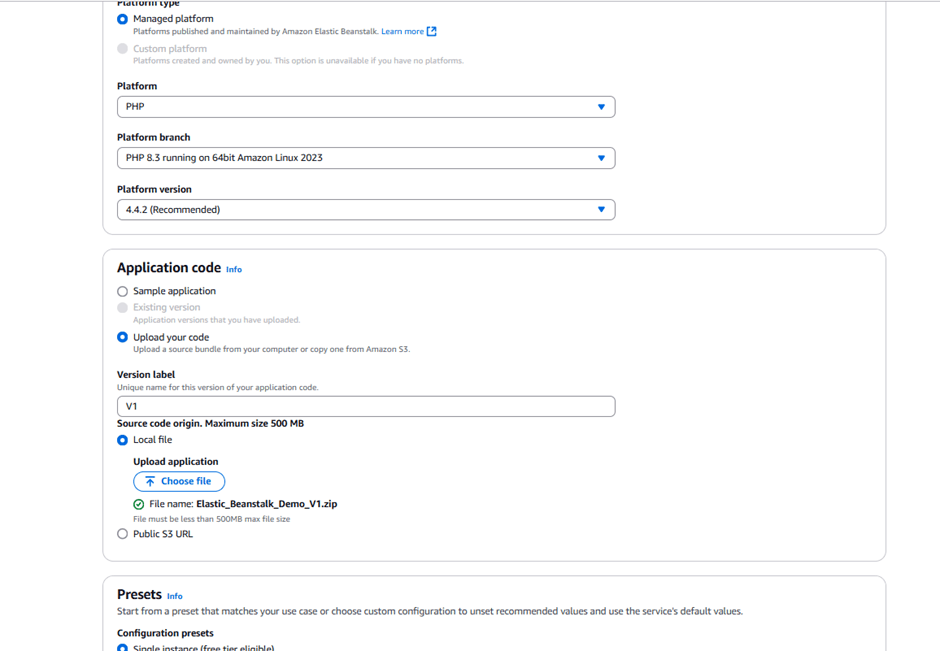
Choose a managed platform and select PHP.
Under Application code, upload your code. Set the version label to v1.
Use the file you downloaded earlier.
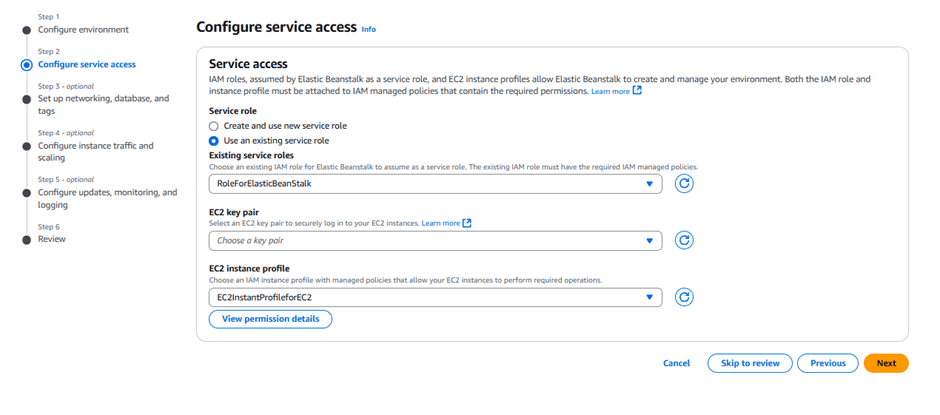
Under Service role, select ServiceRoleForElasticBeanstalk.
Under EC2 instance profile, select EC2InstanceProfileForElasticBeanstalk.
Click “Next” through the optional configuration pages.
On the Configure updates, monitoring, and logging page, select basic health reporting and deactivate managed updates.
Click “Submit”.
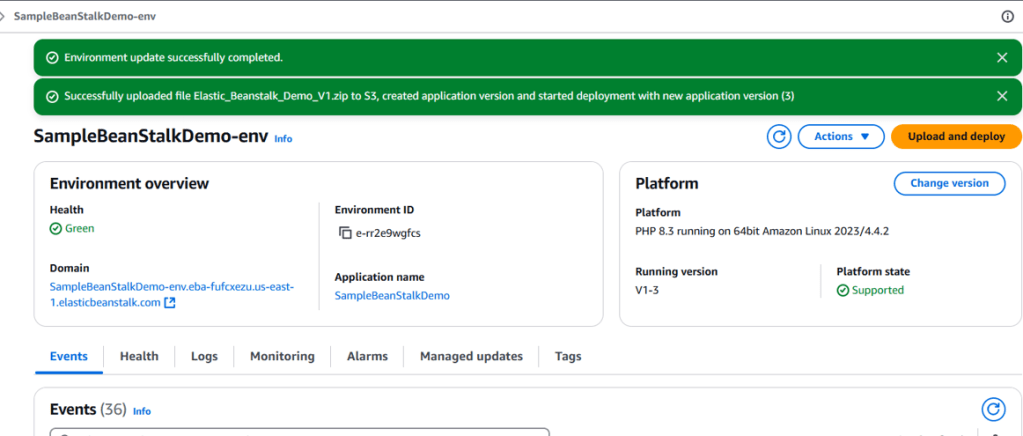
Launching and Accessing Your Application
After a few minutes, your Elastic Beanstalk environment will be ready. You’ll see a confirmation message, and you can click the domain URL under the Environment overview to access your application.
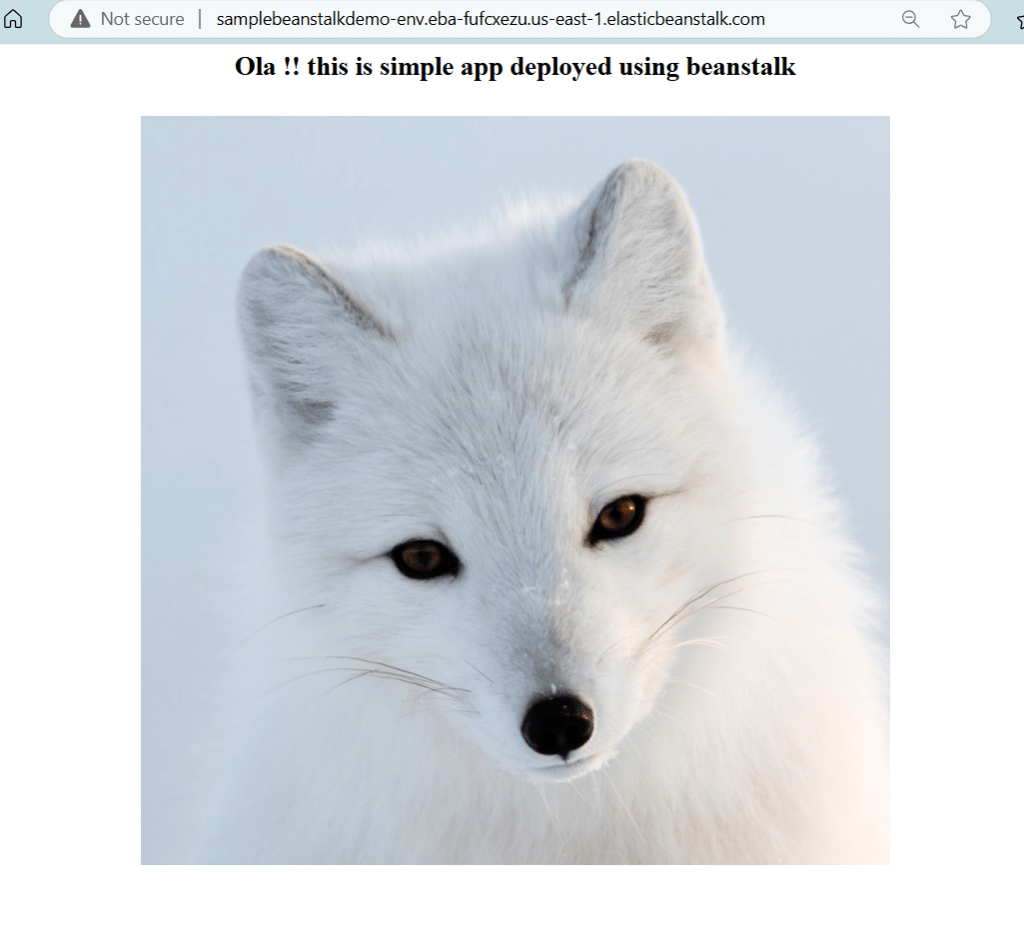
Hit the Domain URL it should take us to the deployed website.
And there you have it! Elastic Beanstalk deploys and scales your web applications, provisioning the necessary AWS resources such as EC2 instances, RDS databases, S3 storage, Elastic Load Balancers, and auto-scaling groups.
In modern cloud environments, automating infrastructure deployment using CI/CD pipelines is a key practice for efficient and scalable operations. In this blog, we will walk you through the process of deploying a Windows Server with IIS (Internet Information Services) installed on Azure using an Azure DevOps pipeline. By leveraging ARM templates and Azure DevOps, we can automate the creation and configuration of the VM. Let’s dive into the steps needed to set up this infrastructure using continuous integration and continuous deployment (CI/CD).
Step 1: Set Up Your Azure DevOps Organization
1.1 Create an Azure DevOps Organization
First, log in to the Azure portal using your lab credentials. We’ll use Azure DevOps for automating the entire deployment process.
In the search bar, search for Azure DevOps and select Azure DevOps organizations.
On the Azure DevOps homepage, click on My Azure DevOps Organizations.
Confirm your account details and click Continue.
On the Get started with Azure DevOps page, click Create new organization, accept the terms of service, and fill out the CAPTCHA.
After verification, click Continue and your organization will be created.
1.2 Create a New Project
Once your organization is set up, create a new project named MyFirstProject and set the visibility to Private.
Click Create project to finalize.
Step 2: Enable Classic Pipeline Editor
Before we begin setting up pipelines, we need to enable the classic pipeline editor for your organization.
Click on Azure DevOps in the top-left corner.
Navigate to Organization settings in the bottom-left corner.
Under Pipelines, click Settings, and toggle off the options for Disable creation of classic build pipelines and Disable creation of classic release pipelines.
Now, return to your project page, and you’re ready to proceed.
Step 3: Push Code to Azure Repos
In the sidebar, select Repos.
You will notice an empty repository for the project. Click Import to add code from an external repository.
To authenticate the Azure DevOps agent, you need to create a Personal Access Token (PAT):
In the top-right corner, click on the User settings icon and select Personal access tokens.
Click New Token and fill in the details:
Name: Enter agentvm.
Scopes: Select Full access.
After creating the token, copy it and store it securely.
Step 5: Set Up the Agent
To interact with Azure DevOps, you need to install and configure an agent on your machine.
5.1 Download and Configure the Agent
Go to the Agent pools section under Pipelines settings.
Select the Default pool, then click New agent.
Choose Windows and copy the download link for the agent.
Use Remote Desktop (RDP) to connect to your VM and open Windows PowerShell.
Download the agent using the following command: Invoke-WebRequest -uri <AGENT_URI> -OutFile "$HOME\Downloads\vsts-agent-win-x64-<version_number>.zip"
Extract the agent and configure it: cd C:\ mkdir C:\agent ; cd C:\agent Add-Type -AssemblyName System.IO.Compression.FileSystem ; [System.IO.Compression.ZipFile]::ExtractToDirectory("$HOME\Downloads\vsts-agent-win-x64-<version_number>.zip", "$PWD")
Run the configuration script: .\config.cmd
During the configuration, enter your Azure DevOps URL and the Personal Access Token you created earlier.
Step 6: Create Build and Release Pipelines
6.1 Create the Build Pipeline
In Azure DevOps, navigate to Pipelines and click Create Pipeline.
Choose Use the classic editor.
Set the repository to Azure Repos Git and select MyFirstProject.
For the Agent pool, select Default.
Add tasks like Copy files and Publish build artifacts to copy the necessary files for your VM deployment.
6.2 Run the Build Pipeline
Save and queue the build. The build process will take a few minutes.
Once completed, check the generated artifact to ensure the files are ready for deployment.
Step 7: Create a Service Connection
You need a service connection to link Azure DevOps to your Azure subscription.
Open Cloud Shell from the Azure portal and initialize PowerShell.
Retrieve your Subscription ID: Get-AzSubscription
In Azure DevOps, go to Project settings > Service connections and create a new Azure Resource Manager service connection, using the subscription details retrieved earlier.
Step 8: Create the Release Pipeline
Navigate to Azure Pipelines > Releases and create a new pipeline.
Add an artifact from the Build pipeline you created earlier.
Select the ARM template deployment task and configure it to deploy the resources to Azure using the provided ARM template.
Step 9: Run the Release Pipeline
Create a new release in the Release Pipeline.
Monitor the release logs as the pipeline runs. The deployment should take around 10 minutes to complete.
Step 10: Verify IIS Installation on the VM
Once the release pipeline completes successfully, you can verify the IIS installation:
In the Azure portal, navigate to Virtual Machines and select the VM you deployed (e.g., win2019-iis-vm-1).
Use RDP to log in to the VM using the admin credentials you provided earlier.
From the Server Manager dashboard, check if IIS is installed. You should see IIS listed in the left navigation panel.
Test the IIS splash page by navigating to http://localhost.
Conclusion
By following these steps, you have successfully automated the deployment of a Windows Server with IIS using Azure DevOps. This CI/CD pipeline ensures that your infrastructure is reproducible, scalable, and quickly deployed. With Azure DevOps, the possibilities for automating and managing your cloud infrastructure are limitless, saving you time and ensuring consistency across environments.
This category of services provides monitoring, logging and auditing of services which are running on AWS.
AWS CLOUDWATCH
AWS cloudwatch is a monitoring service for AWS resources and applications running on AWS it’s a performance monitoring service and at same time CloudTrail is for auditing.
Used to collect and track metrics collect logs and monitor them and accordingly set alarms. Cloudwatch mostly monitors below resources.
EC2 Instances
Dynamo DB
RDS DB instances
Custom metrics generated by applications and services
Log files generated by applications deployed on AWS. Monitors application performance, resource utilization, operational health.
CloudWatch is accessed via API, command-line interface, AWS SDKs, and the AWS Management Console. CloudWatch integrates with IAM.`
CloudWatch retains metric data as follows:
Data points with a period of less than 60 seconds are available for 3 hours. These data points are high-resolution custom metrics.
Data points with a period of 60 seconds (1 minute) are available for 15 days.
Data points with a period of 300 seconds (5 minute) are available for 63 days.
Data points with a period of 3600 seconds (1 hour) are available for 455 days (15 months).
CLOUD TRAIL
Cloudtrail provides visibility into user activity by recording actions taken on your account. API history enables security analysis, resource change tracking, and compliance auditing. Logs API calls made via:
AWS Management Console.
AWS SDKs.
Command line tools.
Higher-level AWS services (such as CloudFormation).
CloudTrail records account activity and service events from most AWS services and logs the following records:
The identity of the API caller.
The time of the API call.
The source IP address of the API caller.
The request parameters.
The response elements returned by the AWS service.
CloudTrail is enabled by default, it’s per AWS account. We can consolidate logs from multiple accounts using an S3 bucket:
Turn on CloudTrail in the paying account.
Create a bucket policy that allows cross-account access.
Turn on CloudTrail in the other accounts and use the bucket in the paying account.
You can integrate CloudTrail with CloudWatch Logs to deliver data events captured by CloudTrail to a CloudWatch Logs log stream.
CloudTrail log file integrity validation feature allows you to determine whether a CloudTrail log file was unchanged, deleted, or modified since CloudTrail delivered it to the specified Amazon S3 bucket.
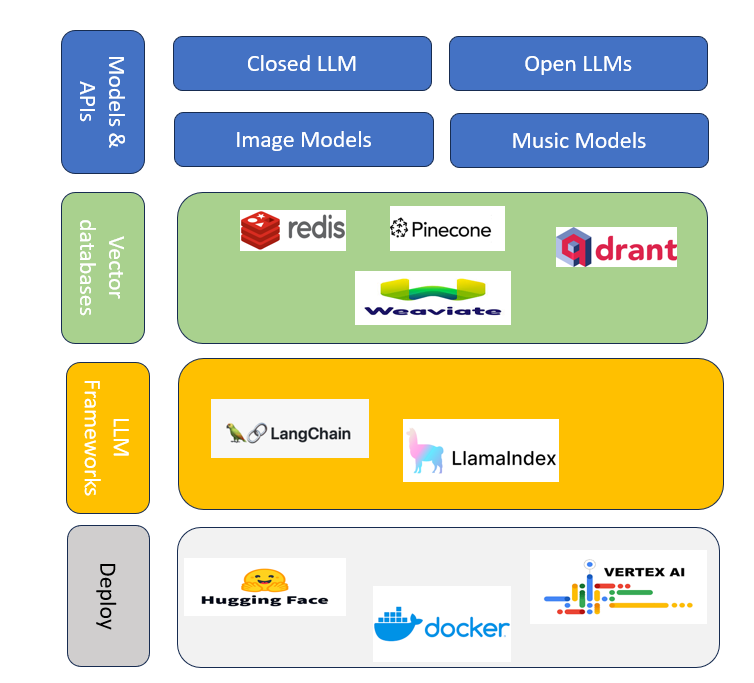
A software stack, as we know, is a collection of tools used to build a software application. Similarly, developing a GENAI application also requires a specific software stack. To know more about software stacks, you can follow this link.
To better understand software stacks, you can follow the provided link. To develop our GENAI application, we should first know which software stacks we need to use.
MODELS AND API
We have different categories of GENAI models broadly it can be defined under four categories.
Closed LLMs
PaLM 2 by google
LLaMA by Meta
Open LLMs
HuggingChat
Dolly by Databricks
StableLM by stability AI
OpenLLaMA by UC Berkley
Image Models
Midjourney
DALLE-3 2 by OpenAI
StableDiffusion by stability.ai
Runway
Music Models
MusicLM by google
MusicGen by Meta
Vector Dtabase
A vector database is a specialized type of database designed to store and manage high-dimensional vector data. Unlike traditional databases that store scalar values (like numbers or text), vector databases handle complex data points represented as vectors1. These vectors can be thought of as arrows in a multi-dimensional space, capturing various characteristics or qualities of the data.
Vector databases are particularly useful for applications involving similarity searches. For example, they can be used to find images similar to a given image, recommend products based on user preferences, or even search for text that matches a particular context2.
How Vector Databases Work
Vector databases use Approximate Nearest Neighbor (ANN) search algorithms to quickly find the closest matching vectors. This is crucial for handling large datasets efficiently2. By clustering vectors based on similarity, these databases can perform low-latency queries, making them ideal for AI applications.
The Synergy of Vector Databases and Gen-AI
Combining vector databases with generative AI can unlock powerful capabilities:
Efficient Data Handling: Generative AI models often require large amounts of data for training. Vector databases can manage and organize this data effectively, enabling faster and more efficient model training1.
Enhanced Search and Retrieval: Vector databases can efficiently retrieve relevant data points for generative AI models, improving the accuracy and relevance of generated content1.
Personalization: By leveraging vector databases, generative AI can provide highly personalized recommendations and content, tailored to individual user preferences. Some examples of vector databases are given below :
Pinecone
Chroma
Qdrant
LLM Frameworks
LLM frameworks allows developer to build complex software using LLMs that can execute a sequence of tasks and access external APIs to perform more complex tasks. Frameworks LLMs to interact with other data sources and APIs and allow them to interact with the software environment. In some of the situation LLMs require to interact with external APIS such as WolframAlpha specifically to solve mathematical problems. Some examples of LLM frameworks are
Langchain
LlamaIndex
Anarchy
ai Deployment
Deployment infrastructure is a combination of services provided by vendors, which allow GENAI applications to be deployed on them. Microsoft provides GENAI deployment services under Azure OpenAI Services. Other examples of deployment infrastructure are Vertex AI by Google and Hugging Face Inference Endpoints.
Understanding the Software Stack: A Comprehensive Guide
In the ever-evolving world of technology, understanding the concept of a software stack is crucial for developers, businesses, and tech enthusiasts alike. A software stack refers to a set of tools and technologies used together to build and run applications and systems. It’s essentially the backbone of any software project, ensuring that various components work seamlessly together. In this blog, we’ll dive into the different layers of a software stack, common examples, and why it’s important to choose the right stack for your project.
The Layers of a Software Stack
A typical software stack consists of several layers, each serving a specific purpose. Here’s a breakdown of the main layers:
Operating System (OS):
The foundation of any software stack. The OS manages hardware resources and provides essential services for other software layers. Common operating systems include Linux, Windows, and macOS.
Web Server:
Responsible for handling HTTP requests from clients (e.g., web browsers). Popular web servers include Apache, Nginx, and Microsoft IIS.
Database:
Stores and manages data used by applications. Databases can be relational (like MySQL and PostgreSQL) or NoSQL (like MongoDB and Cassandra).
Server-Side Programming Language:
The backend code that powers the application’s logic. Common languages include Python, Java, Ruby, PHP, and Node.js (JavaScript).
Frontend Technologies:
Everything that users interact with directly in their browsers. This includes HTML, CSS, and JavaScript, along with frameworks like React, Angular, and Vue.js.
APIs (Application Programming Interfaces):
Enable communication between different software components. RESTful APIs and GraphQL are widely used to connect the frontend with the backend.
Common Software Stacks
There are several well-known software stacks, each with its own strengths and use cases. Here are a few popular ones:
Ideal for: Web development projects, especially open-source ones.
MEAN Stack:
MongoDB (Database)
Express.js (Backend Framework)
Angular (Frontend Framework)
Node.js (Server-Side Programming Language)
Ideal for: Single-page applications and real-time web apps.
MERN Stack:
Similar to the MEAN stack but uses React instead of Angular.
MongoDB (Database)
Express.js (Backend Framework)
React (Frontend Framework)
Node.js (Server-Side Programming Language)
Ideal for: Dynamic web applications with complex user interfaces.
Django Stack:
Django (Backend Framework, using Python)
PostgreSQL/MySQL (Database)
JavaScript (Frontend)
Ideal for: Scalable web applications with robust backend needs.
Why Choose the Right Software Stack?
Choosing the right software stack is vital for the success of your project. Here’s why:
Performance:
Different stacks offer varying levels of performance. Choosing the right stack ensures your application runs efficiently and can handle the expected load.
Scalability:
As your application grows, so do the demands on your software stack. Selecting a stack that supports scalability ensures your project can expand without major overhauls.
Development Speed:
Some stacks come with powerful frameworks and tools that speed up development. This can significantly reduce time-to-market for your application.
Community Support:
Popular stacks often have large communities and extensive documentation, making it easier to find solutions to common problems and stay updated with best practices.
Cost:
The cost of development and maintenance varies between stacks. Open-source stacks like LAMP can be more cost-effective compared to proprietary solutions.
In conclusion, a software stack is an integral part of any software development project. Understanding the different layers and common examples helps you make informed decisions that align with your project’s goals and requirements. Whether you’re building a simple website or a complex application, choosing the right stack sets the foundation for success.
BENEFIT OF INTEGRATION OF github COPILOT WITH GITHUB
Integrating Copilot with GitHub brings a range of exciting features that enhance your coding experience:
Key Features of Copilot and GitHub Integration
Adaptation to Repositories: Copilot can adapt to the coding standards and practices of your specific repositories.
Autocompletion and Suggestions:
Contextual Code Suggestions: Copilot can understand your code context and provide intelligent code suggestions as you type.
Autocomplete Code: It can finish lines or entire blocks of code based on your initial input.
Pull Requests and Issues:
Assisted Pull Requests: Copilot can help you draft pull requests by suggesting code snippets and descriptions.
Issue Resolution: It can suggest fixes for issues reported in your repository, making maintenance more efficient.
Documentation and Comments:
Generate Documentation: Copilot can help generate comments and documentation for your code, improving readability and maintainability.
Code Explanation: It can explain code snippets, making it easier to understand complex logic.
Code Review and Quality:
Review Assistance: Copilot can assist in reviewing code by suggesting improvements and catching potential errors.
Test Generation: It can help generate unit tests, ensuring your code is well-tested and robust.
Learning and Adaptation:
Personalized Learning: As you use Copilot, it learns from your coding style and preferences, offering more relevant suggestions over time.
requirement
Subscription to Copilot. To use GitHub Copilot in Visual Studio Code, you must have an active GitHub Copilot subscription. For information about how to get access to Copilot, see “What is GitHub Copilot?.”
Visual Studio Code. To use GitHub Copilot in Visual Studio Code, you must have Visual Studio Code installed. For more information, see the Visual Studio Code download page.
Search for the extension ‘GitHub Copilot‘ and then click on ‘Install‘. Search for GitHub Copilot
You may then be prompted to enter your GitHub credentials. Click on Sign in to GitHub, then click on Allow and enter your GitHub credentials.
Install the GitHub Copilot Extension
Click the Install button next to the GitHub Copilot extension. VSCode will download and install the extension. Sign In to GitHub
Once the extension is installed, you need to sign in to your GitHub account. You will see a prompt asking you to sign in. Click the Sign in with GitHub button. This will open a browser window where you can log in to your GitHub account and authorize GitHub Copilot.
It might prompt for authorization request as shown so authorize the same.
Once we authorize GITHUB extension will get downloaded and will with configured with VSCode and we can see the GITHUB extension icon over bottom right corner of the vscode editor
Also, once we click on this icon we can see the actual COPILOT menu over the VSCODE
difference between GitHub Copilot and GitHub Copilot Chat
GitHub Copilot and GitHub Copilot Chat are both powerful tools designed to assist developers, but they have different functionalities:
GitHub Copilot
Primary Function: GitHub Copilot is an AI-powered code completion tool that helps developers write code faster and with fewer errors.
Usage: It integrates directly into your IDE (like Visual Studio Code) and provides real-time code suggestions as you type.
Features: It can complete entire lines or blocks of code, generate boilerplate code, and even suggest solutions based on the context of your code.
Focus: It’s primarily focused on improving the coding process by providing smart code suggestions.
GitHub Copilot Chat
Primary Function: GitHub Copilot Chat is designed to provide an interactive chat-based interface for developers to ask questions and receive answers related to their code.
Usage: It allows developers to engage in a conversation with the AI to understand code snippets, get explanations, and ask for assistance with debugging and problem-solving.
Features: It can explain code, suggest optimizations, help with debugging, and provide detailed answers to coding questions.
Focus: It’s geared towards creating a more interactive and educational experience, helping developers understand and improve their code through conversation.
Key Differences
Interaction Style: Copilot is more about inline code suggestions, while Copilot Chat focuses on conversational interaction.
Use Case: Use Copilot for quick code completions and suggestions; use Copilot Chat for in-depth explanations and assistance.
Both tools complement each other and can significantly enhance your development experience.
Provisioners are specific built-in components that allow you to execute scripts on a local or remote machine as part of the resource creation, destruction process or cleanup process before destruction.
requirement
AWS Free tier account
Linux server with terraform installed.
steps / instructions
Login to the AWS linux server and create directory with name mkdir TFProvisioners
Once clone is completed we will get below three files
Main.tf
Setup.tf
Readme.md
If we examine the code under main.tf file
under the resource block we are creating AWS VM named webserver
We are passing a number of parameters for the resource, such as the AMI that the VM will be spun up as, the instance type, the private key that the instance will be using, the public IP attached to the instance, the security group applied to the instance, and the subnet ID where the VM will be spun up
If we examine the provisioner block
The remote-exec keyword tells us that this is a remote provisioner, which invokes a script on a remote resource after it is created.
The provisioner is using the parameters configured in the embedded connection block to connect to the AWS EC2 instance being created.
The provisioner will then issue the commands configured in the inline block to install Apache webserver on CentOS through the yum package manager, start up the Apache server, create a single web page called My Test Website With Help From Terraform Provisioner as an index.html file, and move that file into the data directory of the webserver to be served out globally.
STEPS TO DEPLOY THE CODE AND ACCESS THE DEPLOYED WEB SERVER
Initialize the Terraform working directory, and download the required providers:terraform init
Validate the code to look for any errors in syntax, parameters, or attributes within Terraform resources that may prevent it from deploying correctly:terraform validate You should receive a notification that the configuration is valid.
Review the actions that will be performed when you deploy the Terraform code:terraform plan In this case, it will create 7 resources as configured in the Terraform code.
Deploy the code:terraform apply
When prompted, type yes, and press Enter.
As the code is being deployed, you will notice that the Terraform provisioner tries to connect to the EC2 instance, and once that connection is established, it will run the bootstrapping that was configured in the provisioner block against the instance.
When complete, it will output the public IP for the Apache webserver as the Webserver-Public-IP value.
Copy the IP address, paste it in a new browser window or tab, and press Enter.
Verify that the web page displays as My Test Website With Help From Terraform Provisioner, validating that the provisioner within your code worked as intended. The commands configured in the provisioner code were issued and executed successfully on the EC2 instance that was created.
We are looking for a Node.js Developer responsible for managing the interchange of data between the server and the users. Your primary focus will be the development of all server-side logic, definition and maintenance of the central database, and ensuring high performance and responsiveness to requests from the front-end.
JOB LOCATION
Bangalore
Job Description
● Experience in designing and building large-scale, high availability, secure web applications and REST-ful API using Node.js in an agile methodology. ● Knowledge on Hosting Database instances in cloud Platform(ex: aws,azure,gcp etc.) ● Good Hands-on experience in Node Js frameworks like Express, Socket.io ● Strong proficiency with JavaScript, Node.JS, and ES6 or ECMA 2015 ● Knowledge and understanding of Event Loop architecture. ● Knowledge and understanding of promises and await. ● Integration & Design of data storage solutions [RDBMS, NoSQL DB] [MsSQL,MySQL, MongoDB] ● Implementation of security like oauth 2.0, JWT and data protection. ● Knowledge of caching mechanisms. ● Knowledge and understanding of Request, Axios, proficiency in REST-ful APIs. ● Experience working with Google web services, Docker, AWS Lambda (or equivalent), and Serverless capabilities ● Experience in unit testing library eg Chai, Mocha ● Knowledge of data structures and Algorithms, Node Global variables and In-built libraries ● Understanding the nature of asynchronous programming and its quirks and Workarounds ● Design and implementation of low-latency, high-availability, and performant applications. ● Experience in version control tool Git
MUST HAVE SKILL
● Expert knowledge of NodeJS, ExpressJS, and MongoDB ● MS SQL Server 2008/2012/2014 Database development and Administration experience required ● Knowledge in SQL Server. ● Knowledge on Nodejs Sequlize package. ● Exceptional coding skills in JavaScript with a thorough focus on optimization ● Hands-on experience with scalable, high-traffic applications ● Creating secure RESTful-based web services in XML and JSON


 Sign In to GitHub


