
In the fast-evolving world of DevOps, staying current with best practices is essential. One of the most impactful upgrades you can make is migrating from classic build and release pipelines to YAML-based pipelines in Azure DevOps. This blog walks you through the entire journey—from setting up your Azure DevOps organization to deploying a multi-stage YAML pipeline using a self-hosted agent.
Introduction
Are you still using classic pipelines in Azure DevOps? It’s time to modernize! YAML pipelines offer version control, reusability, and better visibility. In this guide, you’ll learn how to:
- Set up a new Azure DevOps organization and project
- Configure a self-hosted agent
- Create classic build and release pipelines
- Migrate to a multi-stage YAML pipeline
Prerequisites for This Lab
Before you begin migrating classic Azure DevOps pipelines to YAML, make sure you have the following setup and access:
Azure Access
- An active Azure subscription
- Permissions to create and manage resources in the Azure portal
Virtual Machine
- A Windows-based VM provisioned in Azure
- RDP access to the VM using credentials derived from the App Service name (e.g.,
lab-app-xyz→ password:xyzAa!1) - Remote Desktop client installed on your local machine
Azure DevOps Setup
- Ability to create a new Azure DevOps organization and project
- Access to Organization Settings to enable classic pipeline creation
- Familiarity with navigating Azure DevOps UI (Repos, Pipelines, Releases)
Tools and Tokens
- PowerShell installed on the VM
- Microsoft Edge or another browser on the VM
- A generated Personal Access Token (PAT) with Agent Pools → Read & Manage scope
- Notepad or any text editor to store URLs, tokens, and credentials
App Service Credentials
- App Service name (e.g.,
lab-app-xyz) - Password extracted from the downloaded publish profile (value of
userPWD, excluding quotes)
🛠️ Step 1: Set Up Azure DevOps and Your VM
- Connect to your Azure VM
- Use the RDP file from the Azure portal
- Username:
lab-vm - Password: Derived from App Service name +
Aa!1
- Create a new Azure DevOps organization
- Go to Azure DevOps Organizations
- Click Create new organization
- Record the URL (e.g.,
https://dev.azure.com/clouduser123)

- Create a project
- Name it
migrate-classic-pipelines
- Name it

- Enable classic pipelines
- Go to Organization Settings → Pipelines → Settings
- Turn OFF both “Disable creation of classic build/release pipelines”
⚙️ Step 2: Configure a Self-Hosted Agent
- Create an agent pool
- Name it
LabPool
- Name it
- Download the agent
- Use the URL provided in the “New agent” window
- Copy the PowerShell unzip command
- Generate a PAT token
- Scope: Agent Pools → Read & Manage
- Save it securely
- Install the agent on the VM
- Extract the agent
- Run
config.cmd - Use your DevOps URL, PAT, and pool name
- Start the agent with
run.cmd
🧪 Step 3: Create a Classic Build Pipeline
- Import the GitHub repo
- URL:
- Use the Classic Editor
- Add tasks:
- Use .NET Core SDK 8.x
dotnet builddotnet testdotnet publish- Publish Pipeline Artifact
- Fix hosted agent error
- Switch the agent pool to
LabPool
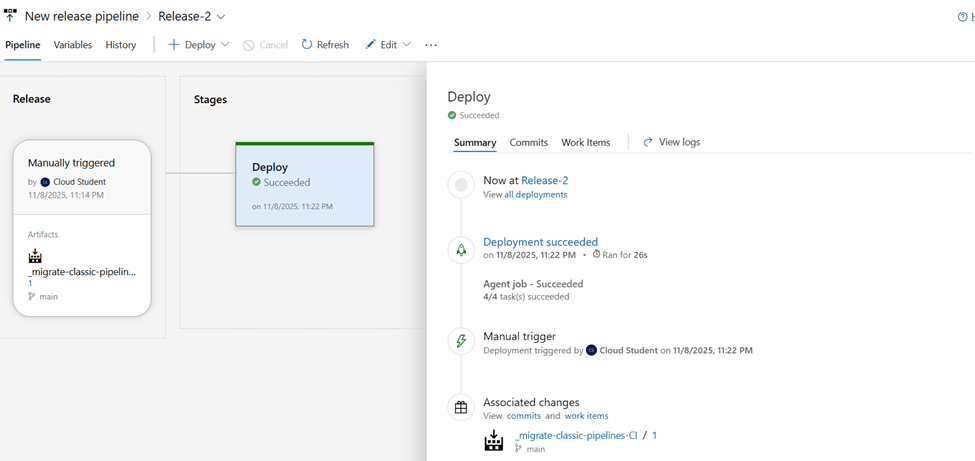
🚀 Step 4: Create a Classic Release Pipeline
- Add artifact from build pipeline
- Enable Continuous Deployment Trigger
- Add a PowerShell task
- Use
deploy.ps1from the GitHub repo - Replace
TODOvalues with your App Service name and password from the publish profile
🔄 Step 5: Migrate to YAML
- Export the classic build pipeline to YAML
- Create a new YAML pipeline
- Use
LabPool - Wrap steps in:
stages: – stage: CI jobs: …
- Add a CD stage
- Include
DownloadPipelineArtifact - Add the PowerShell deployment script
- Update
$packageLocationto match the artifact path
✅ Final Result
You now have a fully functional multi-stage YAML pipeline that builds, tests, publishes, and deploys your app using a self-hosted agent. This setup is:
- Version-controlled
- Scalable
- Easier to maintain
🧠 Pro Tips
- Use Azure Key Vault for secrets instead of hardcoding passwords
- Modularize your YAML with templates
- Monitor your self-hosted agent’s health regularly
